Automated recordings are configured by means of the Edit Recording
dialog (see The Edit Recording Dialog), which can be accessed either by clicking
the Recording button in the Add Event
dialog to create a new record
event or by touching the Edit button
to modify an existing event.
The start parameters of each recording are configured in the
'Start Parameters' section. A recording can be programmed to start
on the basis of the wall clock time, referred to the hard start
time, or upon reception of a general-purpose input, or GPI event
originated by a satellite receiver, tone decoder or other external
device. Programming a hard start time is merely a matter of
entering the desired start time, in 24 hour 'military' format.
Programming a GPI start involves, in addition to entry of the GPI
parameters themselves (matrix and GPI line numbers) that
Window Start and
Windows End times be entered,
that define the 'window'
during which reception of the appropriate GPI event will be
'recognized' by RDCatch. It is also optionally possible to specify
a Start Delay between reception of
the GPI event and the actual start of the recording.
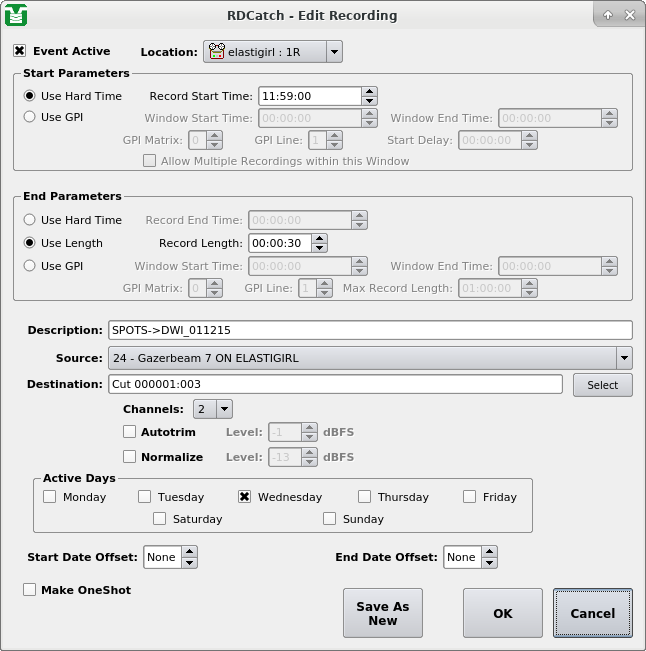
The end parameters of each recording are configured in the
'End Parameters' section. A recording can be programmed to end on
the basis of a hard time, its absolute length or in response to a
GPI event. Programming of the
Hard Time and
Length parameters
should be fairly self-explanatory, while the parameters needed to
program a GPI event are similar to those used for the start
parameters, with the exception of the
Max Record Length setting,
which limits the maximum length of the recording in the event that
the expected GPI event is never received.
If a record event is configured to use GPI for its start and Length
or GPI for its end parameter, then it is possible to configure the
event to make repeated, multiple recordings within a single event
by checking the
Allow Multiple Recordings Within This Window
box in the 'Start Parameters' section. This can significantly reduce
the amount of required record events when capturing material with
high on-air turnover, such as newscasts or traffic reports.
If the selected record deck (chosen in the
Location drop-down menu
at the top of the dialog) as been configured to operate with an
audio switcher device, the appropriate audio input can be chosen
from the Source drop-down menu.
Each programmed recording must have a 'destination', a designated
Cart/Cut which will hold the audio. The currently programmed
destination is shown in the Destination field, and can be changed
by clicking the Select button.
A check should be placed next to each day of the week for which a
recording should be made in the
Active Days box. If no days are
checked, then no recordings at all will be made.
The record event will be actually executed only if
Event Active check box
(in the upper left corner of the dialog box) is ticked. By
clearing this box, it's possible to 'bank' a record event without
actually having it run, useful for events that are only used
sporadically.
For events that need to be executed only once, the
Make OneShot
box can be ticked. Such an event will execute just once, and
then automatically delete itself from the event list.