The RDAirPlay main screen consists of four primary areas: the top area, which contains a variety of indicators for use in live assist situations as well as a set of audio meters; the button widget, which occupies the bulk of the left-hand side of the screen; the right-hand side, which displays either a SoundPanel array or a full log width; and the edit buttons in the lower left-hand corner of the screen.
The top area contains the following indicators:
In the upper left-hand corner is the wall clock indicator, which indicates the current system date and time. If the system administrator has enabled it, this display may also flash RED to indicate possible clock inaccuracy due to loss of master clock synchronization.
Directly beneath the wall clock indicator is the mode indicator,
showing the current automation mode of the log machines. Three
different modes are possible:
Automatic, in which all log features,
including PLAY and
SEGUE transitions and hard times
are fully
enabled; LiveAssist, in which no
automatic transitions or hard start
times are executed but automatic crossfades are done between
elements; and Manual, which is
very similar to LiveAssist except
that not even automatic crossfades are enabled (thus permitting
fully manual crossfade control by means of an external console).
To change RDAirPlay to a different mode, simply touch the mode
indicator until the desired mode is indicated.
Note
The System Administrator may have configured RDAirPlay to allow each log machine to have its mode independently set, in which case touching the mode indicator will only change the log of theMain Log log machine.
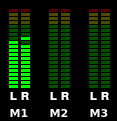 |
Immediately to the right of the wall clock and mode indicator is the audio meter area, containing one or more audio meters (one for each configured audio output on RDAirPlay). Levels are referenced such that '0' level corresponds to -16 dBFS.
Immediately to the right of the audio meter area is the label area. Text messages can be made to appear here (by means of RML commands) to signal the operator concerning the state of the system or need to take some kind of action.
Immediately to the right of the label widget is the user logo. This image can be customized by means of a setting in RDAdmin.
 |
Occupying most of left hand side of RDAirPlay is the button log widget,
consisting of several indicators above a column of seven or more
large buttons adjacent to cart labels.
This widget provides a specialized “view” of the
Main Log log
machine. Specifically, the first seven or more currently playing and/or
next events in that log machine will always be visible here. Events
visible in the button log will be shown in the full log widget as
having a green background. Unlike the full log widget, the button
log is always visible, regardless of which display has been selected
for the right-hand side.
 |
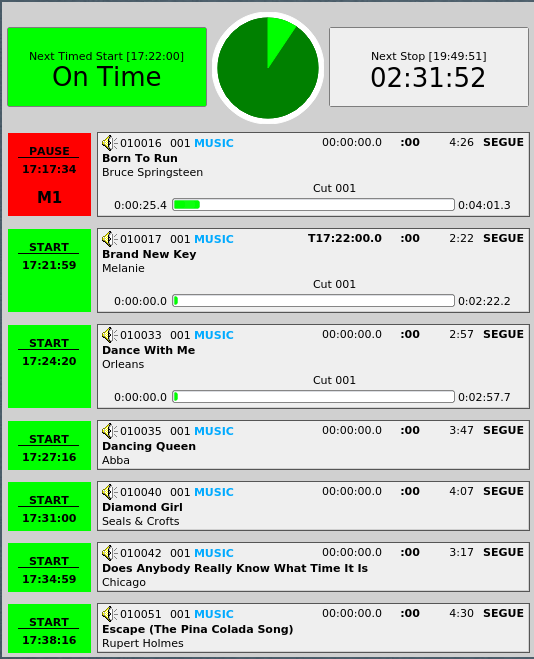
In the upper left-hand corner of the Button Log is the Post Point Counter, which provides timing information regarding the log's next post point (typically, the next event with a hard time attribute).
The counter can be in one of four possible states:
Idle,
On Time,
Under Time or
Over Time.
The counter will provide an estimate of how “on-time” the log currently
is, on the basis of the current time and events still scheduled to be
played.
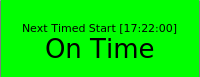
If the playout is such that the next hard time will be reached within one
second of its programmed time, then the counter will be in
On Time mode. The value shown in
the square brackets is the
scheduled time of the hard-timed event.
 |
If the playout is such that the next hard time will be reached
one second
or more before its programmed time, then the counter will be in
Early
mode. It will also give an indication of how
much more material would need to be added to make the join on time.
 |
If the playout is such that the next hard time will be reached one
second or more after its programmed time, then the counter will be in
Late
mode. It will also give an indication of how
much material would need to be removed to make the join on time.
To start an event from the button log, simply touch an event's
corresponding Start button.
Touching the button of a running event
will either (depending upon how the system administrator has
configured RDAirPlay) stop or pause it. To modify an event's
parameters (via the Edit Event dialog), simply double-click the
event's cart label.
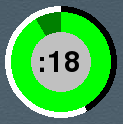 |
In the top center of the top area is the pie wedge widget. This widget counts down the final few seconds of each event. The length of time it counts down, along with whether it counts to the start of the next transition or the absolute end of the event are both configurable in RDAdmin. The color of the band that grows as the countdown progresses (shown in GREEN in the illustration) will change color to indicate if the currently playing event is the last event before a log stopdown. If it is the last, it will be RED, if not, GREEN. A BLUE band and countdown will also appear to indicate the event's talk time (if talk time markers have been set in the underlying cart). If the On-Air flag has been set to ON, the area around the pie widget will be RED.
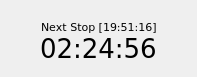 |
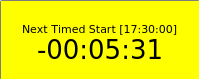
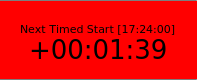
Immediately to the right of the pie wedge widget is the next stop
counter. The large numerals indicate the predicted interval of time
before the next stopdown of the
Main Log machine, with the actual
predicted time in the square brackets. If the
Main Log is already
stopped, then the counter simply displays
Stopped.
Directly below the label area is the right-hand side. The right-hand side can display either a SoundPanel array or a full log widget for each of the three log machines, selected by clicking the appropriate button in the lower right-hand corner of the screen. (NOTE: depending upon how the system administrator has configured the system, not all of the log machine buttons may be visible on your system).
 |
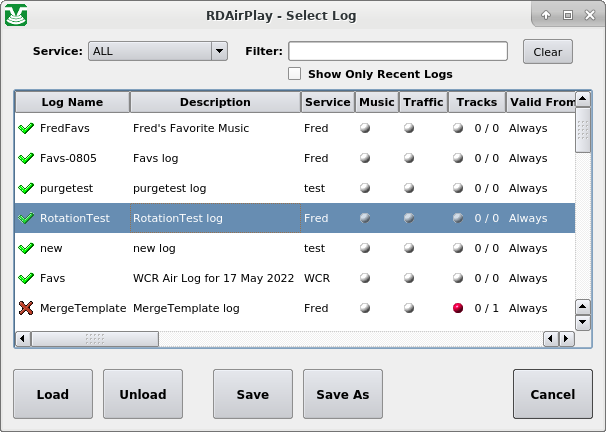
As the name implies, the full log widget can be used to view the
contents of a log over its entire length. To load a log, touch the
Select Log button to bring up the
Select Log dialog, select the
desired log from the list and then touch
Load. The currently loaded
log can also be saved by touching the
Save or
Save As buttons, or
the current log unloaded by touching
Unload.
 |
The Select Log Dialog
Once a log is loaded, it can be started at any point by touching an
event and then pressing the Play
button. Any playing event can
likewise be stopped by touching in the event and then pressing the
Stop button.
To cue-up an event so that it is the next to play
(indicated by the event being the first with a light green
background), touch the event and then press the
Make Next button.
The play parameters of an event can be modified by touching the event,
then pressing the Modify button, bringing up the Edit Event dialog.
In addition to having the ability to modify the event's time and
transition parameters, the Edit Event dialog can be used to audition
the event's audio in Cue or set the start position of the audio for
on-air playback (so as to allow a program to be joined
"in progress", for example). To audition the audio,
simply press the Play button.
The slider can be moved to adjust
where in the audio to audition from. To set the start position,
press the Start button and then
position the slider where you wish
the start to be. The red line on the progress display indicates the
current start position. Pressing the
Start button again returns
the dialog to Audition mode.
 |
The Edit Event Dialog
When running a log, it is often desirable to have the currently
playing event always in sight. To do this, toggle the
Scroll
button "ON" (blue background).