Table of Contents
The Rivendell Library consists of a set of objects called carts (short for "cartridge", a nod to the days when audio material for radio broadcast was commonly loaded to and played from physical magnetic tape cartridges). A Rivendell cart is a data container that holds either one or more pieces of audio (called an audio cart), or macro commands to the system (called a macro cart). Carts are the fundamental schedule building block in Rivendell, in that they are the smallest object or 'atom' that the outside world (like a traffic or music scheduler) can see.
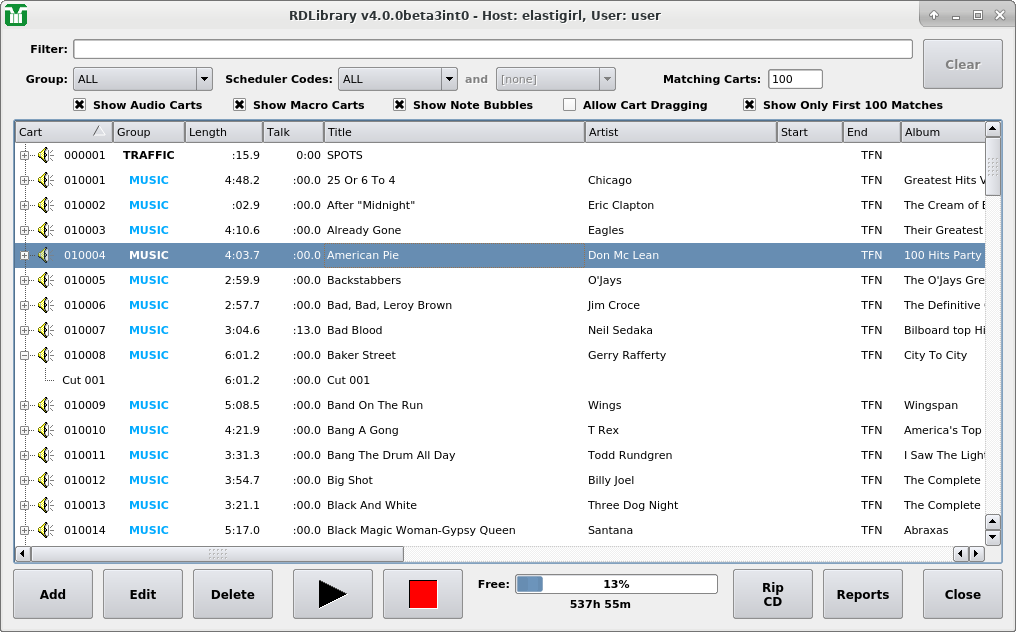
RDLibrary, upon startup, will show the current list of all carts on the system (see below).
 |
RDLibrary Main Window
A number of important attributes of carts can be seen from this illustration. First is the cart's number. Each cart in the Library gets assigned a unique number when it is created. This number can range between 1 and 999999, and is the primary 'handle' by which both Rivendell and external systems (like traffic or music schedulers) refer to the cart. Very often, sites have specific rules concerning which types of audio (commercials, promos, music, etc) and macros get assigned which numbers. We'll cover this area in some detail when we discuss groups.
Note
Cart numbers in Rivendell are commonly displayed so that they always have six digits, even if that means adding leading zeros to the numbers --e.g. cart '123' will be displayed as '000123'. This convention is used as a visual reminder that the value in question is a Rivendell cart number, but it is perfectly valid to use numbers without the leading zeros when inputting cart numbers into Rivendell.Immediately to the left of the cart number is an icon indicating the type of cart. Just to the right of the cart number is the average length of the cart. Except in the case of where timescaling is in use (in which case it will be indicated in blue numerals), this value is calculated automatically by the system.
Next comes various columns showing information from the cart label – Title, Artist, Client and Agency data, etc. This information can be edited by opening RDLibrary's Edit Cart dialog, either by double-clicking on the desired cart entry in the list, or by touching the desired cart entry and then touching the Edit button. In either case, you should get a dialog similar to that shown in the illustration.
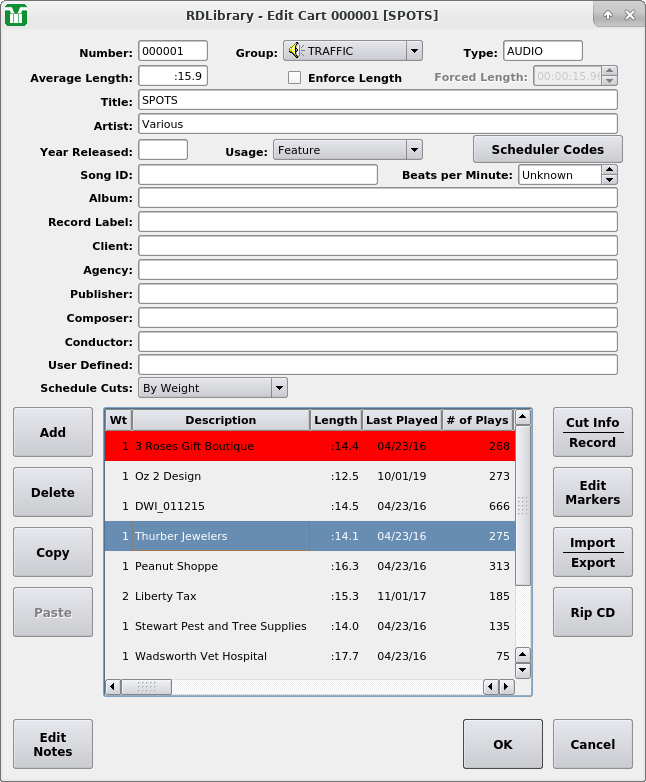 |
The Edit Cart Dialog
Near the center of the dialog will be a dropdown box labeled
Schedule Cuts. When set to
By Weight (the default), this will
allow cut rotation to be managed by means of daypart settings (see
Section 3.1.2.2, “Cut Dayparting”). When set to
By Specified Order, the precise
rotation of the cuts within the cart can be set manually.
This is how an audio cart looks when loaded into the Edit Cart dialog. The upper half of the dialog is the cart label data. The meaning of most of these fields should be fairly self-evident, but a few call for special comment:
- Enforce Length
When checked, this indicates that timescaling should be applied to this cart when it is played in RDAirPlay, meaning that the cart will air at the length indicated by the Forced Length field, rather than the native length of the audio. Care is needed when implementing timescaling within a facility, as there are limits to how much the length can be altered, while only certain types of audio adapters support it at all.
- Group
This is a pull down menu by which the group ownership for the cart can be set. Every cart in Rivendell belongs to precisely one group. The system administrator configures the list of available groups for each user in RDAdmin, and may also define limits to which cart numbers are allowed to belong to particular groups.
- Usage
This defines the use to which the material is put. It is included in records generated by the ASCAP/BMI Electronic Music Report.
- User Defined
As the name implies, this field has no dedicated meaning to Rivendell itself, but is provided for each site to use as is seen fit.
The example in the illustration above shows an audio cart. As such, the bottom half of the dialog displays the lists of cuts contained within the cart.
Each audio cart can contain one or more cuts. A Rivendell cut is an actual piece of audio, somewhat analogous to a 'track' on a CD. Up to 999 such cuts can exist within a single cart. Each line in the cut list contains information about the cut, including:
WtThe weighting value for the cut. see Section 3.1.2.2, “Cut Dayparting” for discussion.
OrderThe order value for the cut. see Section 3.1.2.2, “Cut Dayparting” for discussion.
DescriptionAn arbitrary string, assignable by the user as an aid in keeping track of the content, it is roughly analogous to the 'Title' field in the cart label.
LengthThe actual, measured play out length of the cut audio. This field is calculated automatically by the system.
Last Playedhe last date and time that the cut was aired by one of the on-air modules. Useful for keeping track of stale inventory.
# of PlaysThe total number of times the cut has been aired by the one of the on-air modules.
SourceThe Rivendell user and host names from which the audio content originated.
IngestThe name of the host and the date/time at which the audio content was ingested.
OriginThe name of the host upon which the audio in the cut was last recorded, along with the date and time.
OutcueA user settable field. This line shows up in the RDAirPlay log display when the cut is played.
Start DateThe effective start date/time of the cut.
End DateThe effective end date/time of the cut.
Start DaypartThe start time of the cut's daypart.
End DaypartThe start time of the cut's daypart.
NameThe internal CUTNAME of the cut as used in Rivendell's database.
SHA1The SHA-1 hash value of the cut's file in Rivendell's audio store.
What happens when more than one cut is placed into a cart? The default answer, in a word, is rotation. Rotation is the ability to schedule a single cart in a log, but to have that cart play out different material at different times. This capability has myriad uses. One of the simplest, common in commercial radio facilities, is to allow multiple versions of a spot to be placed into the system, while still allowing the traffic department to have to track and schedule only one cart number. A more sophisticated use involves use of the cut's dayparting settings, forcing different cuts to play based upon certain date/time criteria, such as day of the week or time of day. Cut dayparting is a very powerful feature in Rivendell, and is something we will discuss shortly.
To edit the properties of a cut, either double-click its entry
in the cut list, or touch it once to highlight and then touch
the Cut Info/Record button.
The Record Dialog will now open up.
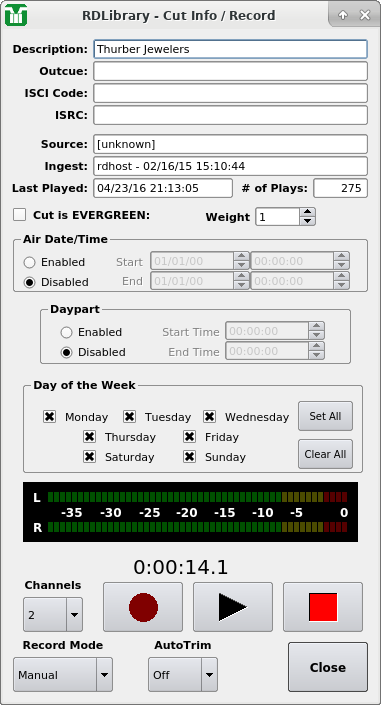 |
The Record Dialog
Roughly the upper third of the dialog is for editing the various cut parameters, the middle section is for configuring the cut's daypart settings, and the bottom third is a record machine that can be used both to record new audio into the system and to audition any recording already made.
For carts for which Schedule Cuts
is set to By Weight, each cut in
can be dayparted on the basis of these parameters:
- Weight
- Absolute Start and End Date-Time
- Relative Start and End Time
- Day of the Week
While not strictly a dayparting parameter, the
Weight setting of a cut can
strongly influence
the order (and hence placement) of when a particular cut will play.
The weight value of each cut in a cart consistutes the numerator
of a fraction, the denominator of which is the sum of the weight
values of every cut in the cart. Rivendell's cut selection
algorithm will seek to play each cut in like proportion. If it is
important in some cases to be able to specify the precise order
of each cut play-out, consider changing the
Schedule Cuts dropdown to
By Specified Order.
By default, each newly created cut in a
By Weight cart starts out with
dayparting
disabled, meaning that it will be 'eligible to play' at all times.
By clicking the Enabled radio
button in the Air Date/Time box, an
absolute start and end date for the cut can be entered, meaning
that the cut will be prevented from airing in the on-air modules
at any time outside the range of those date-times. Likewise, by
selecting the Enabled radio button
in the Daypart box, start and end
times (relative to the day the cut is to air) can be entered.
Cuts designated in this way will be allowed to air only within
the specified range of times. Finally, by ticking or clearing
the appropriate boxes in the
Day of the Week box, a cut can be
constrained to air only on certain days of the week.
All of the dayparting parameters can be used either singly or in combination with each other. When combined, the resulting 'eligibility' is calculated as the logical AND of the applied dayparting limits. For example, a cut with the 'Monday' box cleared will refuse to air on Mondays, regardless of whether any of the other daypart rules match.
It's important to remember that dayparting rules affect audio play out only within the on-air modules. You will still be able to audition and play the audio without limitation in the other Rivendell modules.
By ticking the Cut is EVERGREEN
box, the cut is played into evergreen mode; wherein the normal
dayparting rules are bypassed. Instead, such a cut will play if.
and only if, no other cuts in the cart
are eligible to play, thus providing insurance in the event that
other cuts in the cart were not updated in a timely fashion.
Each cart or cut in RDLibrary is assigned a color to indicate it's 'playability' for air, as follows:
- NO COLOR
Event will play normally
- CYAN
Event will not play (cut datetime is in the future)
- RED
Event will not play (outside of dayparting limits or audio is not available)
- GREEN
Event will play an Evergreen
Caution
It's important to remember that the color displayed for each event indicates playability at the instant that the event is being viewed.The lower third of the Record Dialog is used both to audition and record audio. To audition the cut, simply press the play button (the one with the triangular symbol). The button will illuminate, audio will show on the bar meter and start playing immediately. The audio will play to completion, unless either the stop button (square symbol) is pressed, or the Record Dialog is closed.
To record new material into a cut, first ensure that the
Channels
drop-down menu is set to record the appropriate number of channels,
then touch the Record button
(round symbol). If the cut contains
audio that was recorded previously, a warning box will pop up at
this point to inform you of this and to give you a chance to abort
the recording without erasing what was previously recorded. If
Yes is selected here, the
previous recording will be overwritten
and no longer accessible.
The Record button will now be
illuminated steadily, while the
Play button will be flashing,
indicating that the record machine is in 'ready' mode. The bar
meter will also be active to indicate input levels, and this is
the point where you want to verify that your levels are correct,
with peaks just into the yellow area being optimal. Nothing is
actually being recorded just yet.
We have two options for actually starting the record machine.
We can start it manually by pressing the
Play button, at which
point the machine will immediately begin recording, or we can set
the Record Mode drop-down menu
to the VOX (short for voice
activated) setting. When in VOX
mode, the record machine will
start automatically as soon as it senses the presence of audio
at the input.
Once started, recording will continue until either the
Stop button
is pushed, or the maximum allowed length for a manual recording
(set by the system administrator) has been reached. Once stopped,
if the AutoTrim drop-down menu
has been set to On, the Start and
End markers will be automatically set to the beginning and end of
detected audio within the cut. (We will discuss Markers in detail
when we get to the section on the Edit Markers dialog).