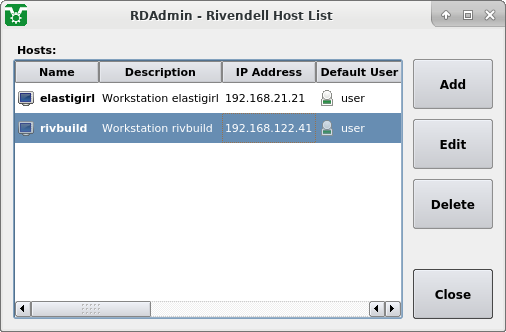
To manage hosts in RDAdmin, touch the
Manage Hosts button to open
the Rivendell Host List dialog.
 |
The Rivendell Host List Dialog
To examine and modify an existing host, touch its entry in the
Hosts list and then touch the
Edit button to open the
Host Dialog.
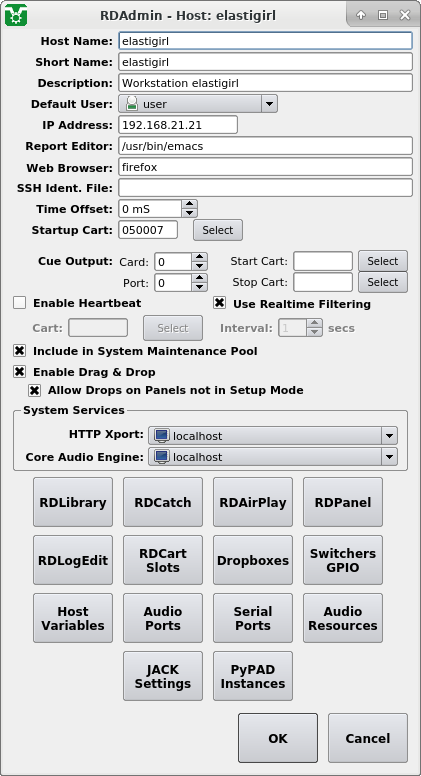 |
The Host Dialog
Note
After changing the configuration of a Rivendell module, it is generally necessary to restart that module for the changes to take effect!
The dialog is divided into roughly two parts: the upper half, which contains settings that pertain to the selected host overall, and the lower half, which contains buttons that access settings specific to a particular Rivendell module or subsystem.
The Host Name: (read-only),
Short Name: and
Description: fields are for
text strings. The value of these fields is accessible using
filepath wildcards.
The Default User sets the value of
the Rivendell user that will be logged in by default --i.e. when
the system is restarted or the
Default User button is touch in
rdlogin(1).
The IP Address: field should contain
the IPv4 address of the host. For multi-homed systems, an address that
is reachable from all other Rivendell hosts should be specified. If
this host is the sole host in the Rivendell database, then it is
acceptable to specify the loopback address
(127.0.0.1) here.
The Report Editor: can be used to
specify an external text editor to be used to display reports.
If desired, the value should consist of the command invocation
needed to start the editor.
Note
If left blank, the system will use the vi(1) editor running in an xterm(1) window --i.e.xterm -e vi.
The Web Browser: is used to
specify an external web browser to be used to display HTML content.
If desired, the value should consist of the command invocation
needed to start the browser.
The SSH Ident. File: field contains
the path to the SSH identity (private key) file used to
authenticate SFTP file transfers when the
Authenticate with local identity file
box is ticked in an RSS feed's configuration dialog. See the
ssh-keygen(1) man page for
information on generating SSH identity key pair files.
Caution
The SSH identity file must be owned by the same user specified by theAudioOwner parameter in the
[Identity] section of the
rd.conf(5) configuration
file and have permission mode 0600,
otherwise transfers with fail with an
Authentication Failed error.
See the rd.conf(5) man
page for more information. See Appendix H, Creating and Configuring a Secure Shell Identity Key-pair for
Rivendell
for an example.
The Time Offset: field can be used
to specify a static time offset in milliseconds to by applied to
events in rdcatch(1).
The Startup Cart: field takes the
number of a macro cart to be executed each time the Rivendell system
is restarted. This can be useful for initializing state --e.g. JACK
routes, etc.
The Cue Output controls specify the
audio output to be used for off-line "audition" uses. The
Start Cart: and
Stop Cart: fields take the number
of a macro cart that will be executed each time a cut play starts or
stops, respectively (useful for things such as dimming control room
audio monitors).
If the Enable Heartbeat box is ticked,
then the macro cart specified in the
Cart: will be executed at the specified
interval as a means to provide a system watchdog heartbeat.
If the Use Realtime Filtering box is
ticked, then the filter parameters when searching for carts will be
applied after each keystroke or parameter change. If unticked, then
the Search must be touched before
altered filter parameters will be applied.
If the Include in System Maintenance Pool
box is ticked, than this host will be included in the pool of systems
eligible to run automatic system maintenance routines in the background.
This setting should normally be left ticked unless the host in question has a limited bandwidth connection to the Rivendell database or audio store --e.g. is remotely located from the Rivendell server.
If the Enable Drag & Drop box is
unticked, then Rivendell's drag and drop system will be disabled. If
ticked, then dropping carts on SoundPanels can be disabled by unticking
the
Allow Drops on Panels not in Setup Mode
box.
The System Services can be used
to allow this host to use the
HTTP Xport: or
Core Audio Engine services of another
host in the Rivendell network.
To configure the rdlibrary(1) module, touch the
RDLibrary button to open the
Configure RDLibrary dialog.
 |
The Configure RDLibrary Dialog
The INPUT and
OUTPUT are used to specify
the audio input and output to be used.
The Max Record Time field sets
the maximum time that rdlibrary(1)'s Record widget will run in
record mode; when this time is reached, it will be automatically
stopped. To allow an unlimited record duration, set this to
00:00:00.
The VOX Threshold control sets
audio level at which to automatically begin recording when the
Record Mode control is set to
VOX in the Record dialog.
The AutoTrim Threshold control sets
audio level at which to trim the ends of the recorded audio when the
AutoTrim control is set to
On in the Record dialog.
The Tail Preroll control sets
how far before an end marker the audio cursor will be positioned
when auditioning a marker edit.
The Ripper Device field specifies
the CD-ROM device to be used for ripping audio CDs.
The Paranoia Level dropdown
specifies the amount of error checking/recovery to be applied
when ripping CDs, with Normal being
the maximum amount. With modern CD-ROM hardware, it is often possible
to obtain significantly faster ripper performance by setting this
control to Low or even
None.
For further information on the Low
and None options, see the
'-Y' and '-Z' options in the
cdparanoia(1) man page or
https://linux.die.net/man/1/cdparanoia.
The Read ISRC from CD: dropdown
controls whether the ripper will attempt to read International
Standard Recording Code data from audio tracks when loading the disc.
Setting this
to Yes can cause CD-ROM drives
to take significantly longer to
read the table of contents of
newly inserted discs when the disc does not contain ISRC data.
The CD Metadata Source: dropdown
determines the type of data source that will be used to lookup
CDs for external metadata records. Three options are available:
- MusicBrainz
Use a MusicBrainz database. This is the default.
If selected, the
MusicBrainz Server:field is used to provide the hostname of the server. Default value ismusicbrainz.org, a public server provided by the MetaBrainz Foundation (but kindly see the note regarding commercial use at https://metabrainz.org/supporters/account-type).- CDDB
Use a CDDB database.
If selected, a
CDDB Server:field will also appear, which takes the hostname of the CDDB server to use (default valuefreedb.freedb.org).- None
If selected, no external metadata lookup will be performed.
Note
Rivendell's CD rippers will also attempt to detect CD-Text data on all discs and will use any information so detected in preference to that supplied by an external lookup.
The Format: dropdown indicates the
audio encoding format to be used in Rivendell's audio store for
ingested material.
The Bitrate: dropdown indicates
the bitrate to be used when encoding ingested material to
MPEG Layer 2.
If set to Yes, the
Allow External Editing dropdown
will cause an Edit Audio button
to be displayed when editing audio carts.
The Sample Rate Converter: dropdown
controls which algorithm will be used when resampling ingested audio
to a different sample rate. For more information regarding the various
algorithms available, see
http://mega-nerd.com/SRC/api_misc.html#Converters.
When ticked, the Limit Searchs at Startup
box will cause the
Show Only First 100 Matches box
to be ticked when starting a new instance of rdlibrary(1).
The Allow Multiple Instances, if set
to Yes, will allow multiple, independent
instances of rdlibrary(1) to
be run simultaneously.
The Channels: dropdown sets the
default value of the Channels:
dropdowns in rdlibrary(1).
The Record Mode and
AutoTrim dropdowns set the
default value of the respective dropdowns in the Record dialog.
The Normalization Level: control
sets the default value of the
Normalization Level: controls in
rdlibrary(1).
To configure the rdcatch(1) module, touch the
RDCatch button to open the
Configure RDCatch dialog.
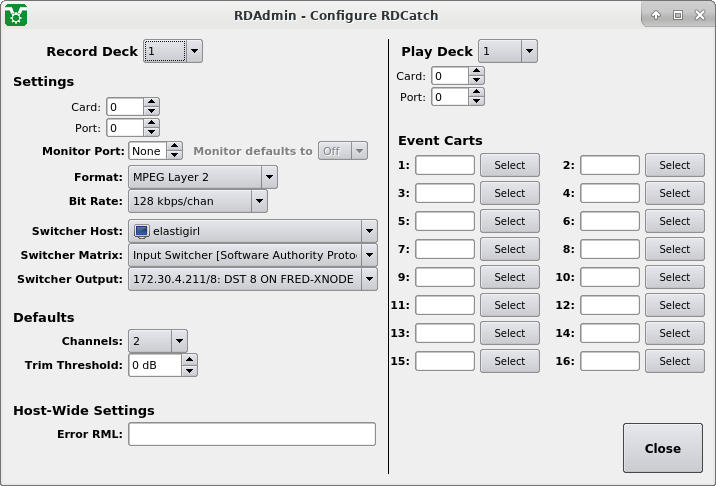 |
The Configure RDCatch Dialog
The RDCatch Dialog consists of four sections: Record Deck, Play Deck, Defaults and Host-Wide Settings.
The Record Deck dropdown selects
the record deck to be configured.
The Card: and
Port: controls select which
audio input will feed the deck, while
Monitor Port: allows an
audio output to be configured for monitoring audio during recording.
The Format: and
Bit Rate: dropdowns are used
to specify the audio encoding format used in the Rivendell audio
store with recordings from this deck.
Bit Rate: is used only for a
Format: setting of
MPEG Layer 2.
The Switcher Host:,
Switcher Matrix: and
Switcher Output: dropdowns can
be used to configure a switcher device for routing multiple audio
signals into this record deck on a per-event basis. The specified
switcher output should be connected to the input specified by the
Card: and
Port: controls.
Note
See Section 12.5.8, “Configuring Switcher/GPIO Devices” for more information on configuring switcher devices.
The Channels: control sets
the default value of the same control in RDCatch, while the
Trim Threshold sets the default
value of the autotrim Level:
control.
The Play Deck dropdown selects the
play deck to be configured.
The Card: and
Port: controls select which
audio output will be used by the deck.
The Event Carts fields take the
number of
the macro cart that will be executed each time the corresponding
event marker, originally placed during recording by the Cut Event
['CE'] RML is encountered during playback. See
Section 14.9.9, “Cut Event [CE]” for more information.
To configure the rdairplay(1) module, touch the
RDAirPlay button to open the
Configure RDAirPlay dialog.
 |
The Configure RDAirPlay Dialog
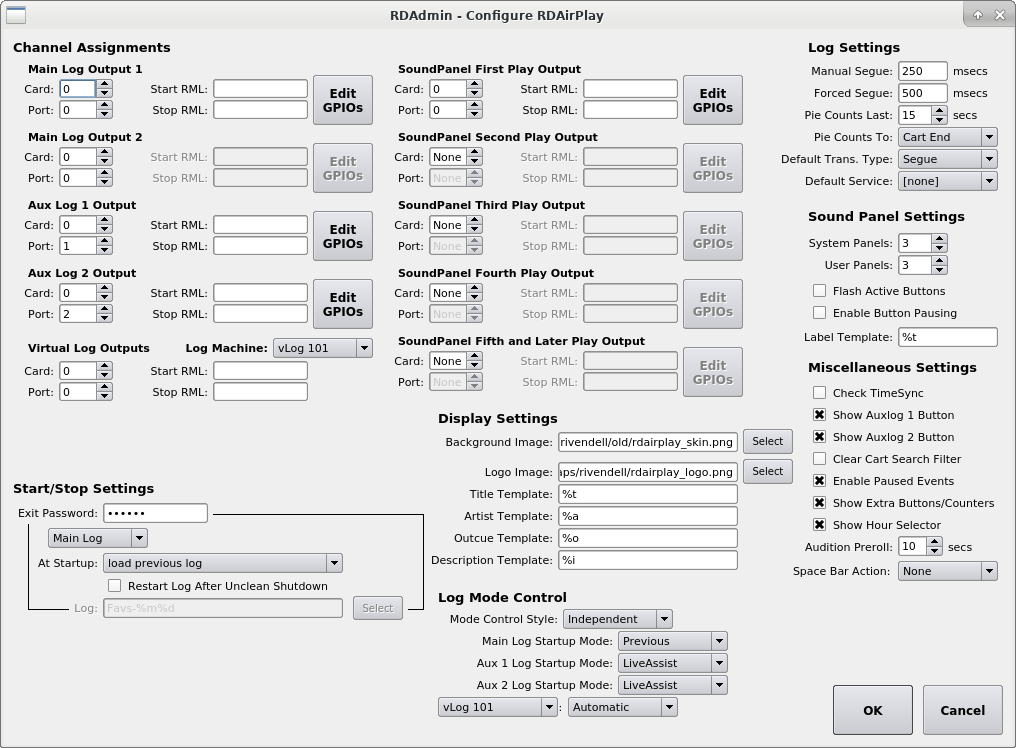
The Channel Assignments section
contains controls for configuring the audio outputs, along with
associated fader metadata and automation.
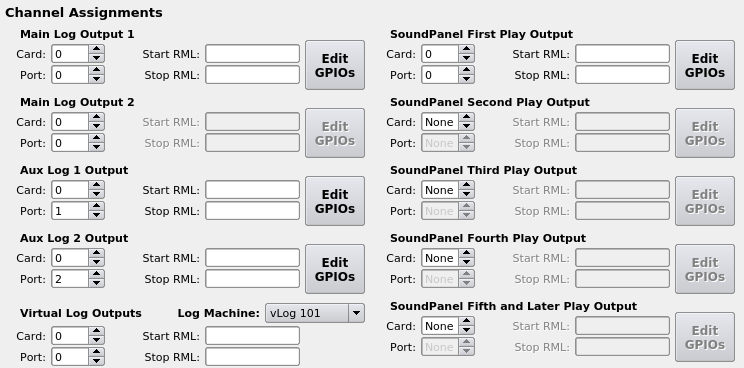 |
Channel Assignments Section
Audio outputs for the Main Log, both Aux Logs, Virtual Logs and
the Sound Panel are configured by means of the
Card: and
Port: controls. For the Main Log,
if both
Output 1 and
Output 2 are set to different
card and/or port values, RDAirPlay's output will alternate
between the two outputs.
Each of the corresponding
Start RML: and
Stop RML: fields can take
RML code that will be executed each time the associated channel
is started or stopped.
Metadata wildcards can be used in these fields, which will
reflect the values of the cart being started or stopped.
To configure fader automation for a given channel, touch its
Edit GPIOs button to
open the Edit Channel GPIOs dialog.
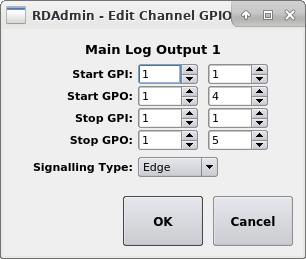 |
Edit Channel GPIOs Dialog
The GPI fields specify a general
input event coming into Rivendell (typically mapped from the
fader ON or OFF status signal on the associated mixer desk).
Reception of
this signal will cause the corresponding RDAirPlay channel to be
started or stopped.
The GPO fields specify a general
output event emitted by Rivendell each time the corresponding
channel is started or stopped (typically mapped to the fader
ON or OFF remote control on the associated mixer desk).
Note
See Section 12.5.8, “Configuring Switcher/GPIO Devices” for more information on configuring GPIO devices.
The Start/Stop Settings section
controls the behavior of rdairplay(1) when the module is first
opened and finally closed.
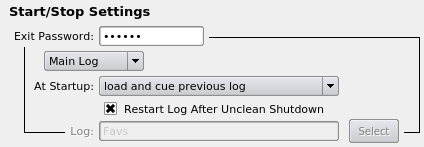 |
Start/Stop Section
The Exit Password: field can be
used to specify a password that must be entered when exiting
rdairplay(1) (useful for preventing inadvertent shutdowns).
For each of the selected log machines
it is possible to specify the action to take at startup by selecting
the appropriate value in the
At Startup: dropdown. If the
Restart Log After Unclean Shutdown
box is ticked, then rdairplay(1) will attempt to restart the log
from the event which was playing when the unclean shutdown occurred.
The Display Settings section
controls the contents and formatting of the label areas of the
button widget as well as the "skin" used for the
overall rdairplay(1) window.
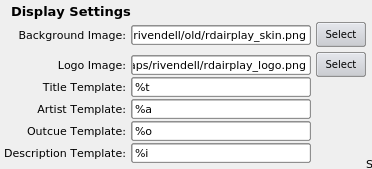 |
Display Settings
The Background Image: field takes
the full path to an image file to use as the background
"skin" for RDAirPlay's main window. The file should
be of type JPG or PNG.
The Logo Image: field takes the
full pathname to an image file to display in the upper right-hand
corner of RDAirPlay. The image should should have dimensions of
167x125 pixels and be of type JPG or PNG.
Each of the Template: fields
define the formatting of one of the lines of the label areas in the
button widget. Metadata wildcards are used to define the contents
to be displayed. See Section E.1, “Metadata Wildcards”
for a list of supported wildcards.
The Log Mode Control section
configures the behavior of RDAirPlay mode controls.
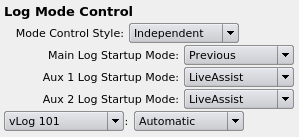 |
Log Mode Control
The Mode Control Style dropdown is
used to specify whether operating mode of the log machines are
always the same (Unified mode) or
can be separately set (Indepdendent
mode).
The startup states of the log machines can be set by means of the
Start Mode: dropdowns.
The Log Settings section
configures the behavior of log operations.
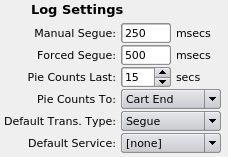 |
Log Settings
The Manual Segue: field specifies
the duration of the segue overlap to apply when manually starting
a log event while one or more other events are currently playing.
The Forced Segue: field specifies
the duration of the segue overlap to apply when a hard time event
starts while one or more other events are currently playing.
The Pie Counts Last: field specifies
when the pie widget begins its countdown, relative to the setting
of the Pie Counts To: dropdown. If
set to Cart End, countdown will
always be relative to the end marker of the cut, whereas a setting
of Transition will count down
relative to the start of the transition to the following event.
The Default Trans. Type dropdown
determines what transition type will be applied by default when
adding a new event to a log.
The Default Service: dropdown
determins what service will be associated with a newly created
log.
The Sound Panel Settings section
configures the behavior of Sound Panel operations.
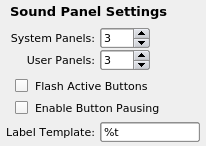 |
Sound Panel Settings
The total number of System and User panels are set with the
System Panels: and
User Panels: fields respectively.
If the Flash Active Buttons box
is ticked, then the buttons in the button widget that correspond
to playing events will flash.
If the Enable Button Pausing box
is ticked, then touching the button of an playing event will cause
it to pause rather than stopping. A paused event can be restarted
by pressing its button again.
The Label Template control
determines the default button legend for newly created Sound
Panel buttons.
Metadata wildcards can be used in this field. See
Section E.1, “Metadata Wildcards” for a list of supported
wildcards.
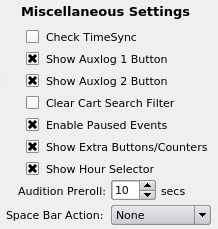 |
Miscellaneous Settings
If the Check Time Sync box is
ticked, the status of the kernel's time synchronization PLL lock
will be check periodically. If not locked, the wall clock will
flash red.
Ticking Show Auxlog 1 or
Show Auxlog 2 boxes will cause
selector buttons for the respective log machines to be displayed.
If the Clear Cart Search Filter box
is ticked, the cart search dialog's filter will be cleared each
time the dialog is redisplayed.
If the Enable Paused Events box is
ticked, touch the button for a playing event will cause that event
to be paused rather than stopped. A stopped event can be restarted by
touching it again, dismissed by deleting the event.
Ticking the Show Extra Buttons/Counters
box will cause Audition Head,
Audition Tail buttons and the
Run Length to be displayed as part
of the List Log widget.
Ticking the Show Hour Selector will
cause the Hour Selector to be displ;ayed as part of the List Log
widget.
The Audition Preroll sets how far
before the current play position an audition playout will begin.
The Space Bar Action dropdown
sets what action will taken when the space bar is pressed.
To configure the RDPanel module, touch the
RDPanel button to open the
Configure RDPanel dialog.
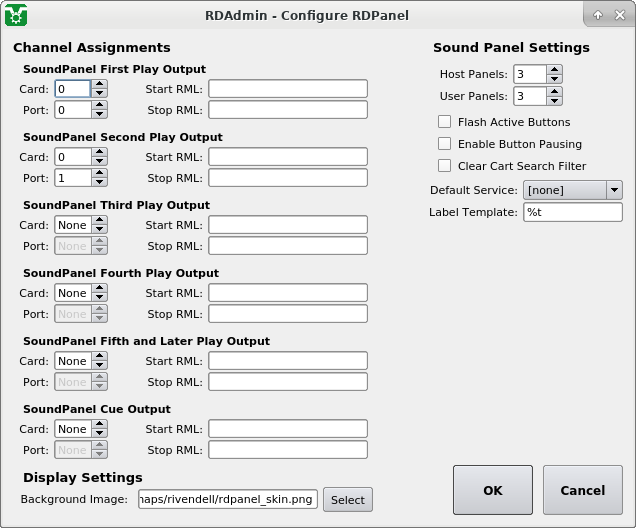 |
The Configure RDPanel Dialog
The RDPanel application is merely a larger version of the Sound Panel portion of RDAirPlay. As such, its configuration is very similar to that of the Sound Panel section in Section 12.5.3, “Configuring RDAirPlay”. Please see that section for details.
Although RDPanel's panels appear similar to RDAirPlay's panels, RDPanel has its own set of system and user panels that are independent of RDAirPlay and must be set up separately.
To configure the rdlogedit(1) module, touch the
RDLogEdit button to open the
Configure RDLogEdit dialog.
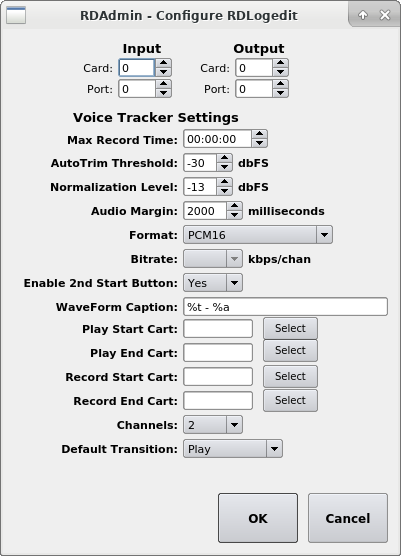 |
The Configure RDLogEdit Dialog
The Input and
Output controls are used to specify
the audio input and output to be used for the interactive
voicetracker.
Caution
These channel assignments are also used for the voicetracker when it is being accessed through the RDAirPlay module!
The Max Record Time field sets
the maximum time that rdlogedit(1)'s voice tracker will run in
record mode; when this time is reached, it will be automatically
stopped. To allow an unlimited record duration, set this to
00:00:00.
The AutoTrim Threshold control sets
audio level at which to trim the ends of the recorded audio in the
voice tracker.
The Normalization Level control sets
audio level at which to peak normalize the recorded audio in the
voice tracker.
The Audio Margin control sets
how much of the end of the first track in the voicetracker will
be visible by default when a new transition is loaded.
The Format: and
Bit Rate: dropdowns are used
to specify the audio encoding format used in the Rivendell audio
store with the voice tracker.
Bit Rate: is used only for a
Format: setting of
MPEG Layer 2.
If the Enable 2nd Start Button:
dropdown is set to No, then
the voice tracker will not display the second
Start button (and hence, not
run the event that follows the recorded track), but wait for the
Save button to be touched after
starting the track recording.
The Play Start Cart:,
Play End Cart:,
The Record Start Cart: and
The Record End Cart: fields each
take the number of a macro cart to be executed when the respective
audio signal starts or ends. (Useful for automated external audio
paths changes to support voicetracking operations).
The Channels: dropdown indicates
the number of channels to use when recording voicetracks.
The Default Transition indicates
the transition type to use by default when adding a new log
event.
To configure the rdcartslots(1) module, touch the
RDCartSlots button to open the
Configure RDCartSlots dialog.
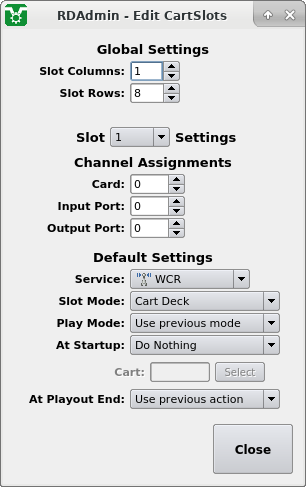 |
The Configure RDCartSlots Dialog
The Global Settings section is used
to configure the number and arrangment of cart slots. The number of
supported slots is limited only by the available resolution of the
display monitor.
The Slot Settings is used to
configure each individual slot.
Channel Assignments settings are
used to specify the audio input and output to be used. (The
Input Port value is used only
when the slot is in Breakaway mode.)
The Default Settings settings are
used to configure the detailed behavior of the specified cart slot.
Service: defines the slot's default
service when in Breakaway mode.
Slot Mode: sets the mode of the
slot and Play Mode sets the default
state of the Full or Hook
play mode. The contents of the slot at startup can be set using the
At Startup: dropdown, and the
action when play-out finishes set in the
At Playout End: control.
A dropbox is a Rivendell process that runs in the background and performs automatic file importation. At its most basic level, each dropbox is configured to have a specific group (within whose carts audio is saved) and a path (a location in the filesystem whence the dropbox will obtain audio to import). When one or more audio files that match the path specification are copied to the path location, the dropbox will automatically import the file(s). There are a number of additional parameters which can be set to influence the way in which a particular dropbox will process audio, which will be covered below.
The number of dropboxes capable of being configured on a given host is limited only by that host's hardware capabilities.
To see the list of dropboxes currently configured on the system,
touch the Dropboxes button to open
the Rivendell Dropbox Configurations Dialog.
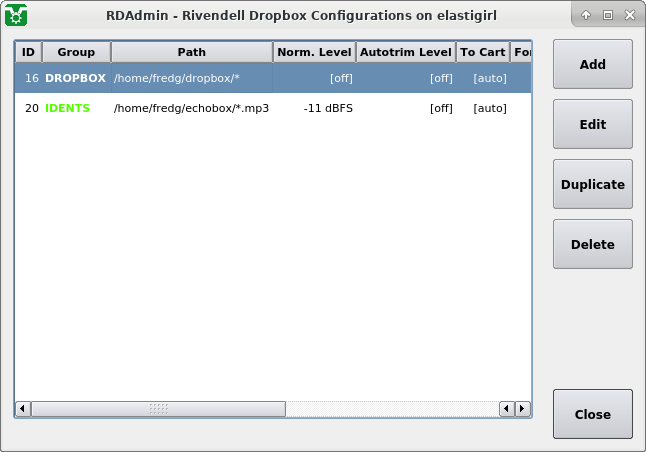 |
The Rivendell Dropbox Configurations Dialog
A new dropbox can be created by touching the
Add button, opening the
Dropbox Configuration dialog.
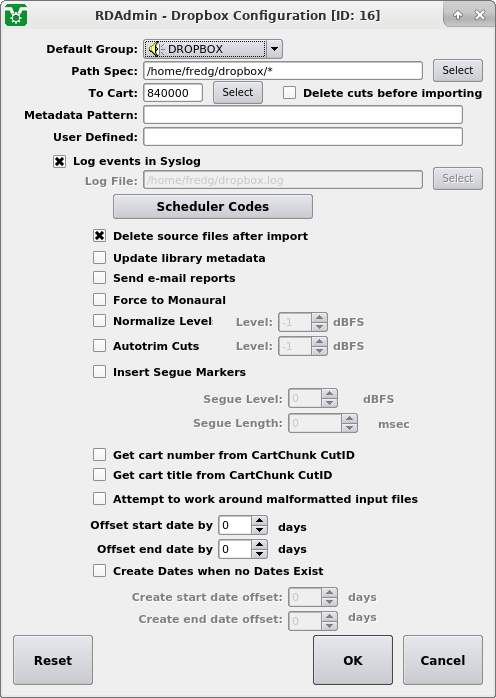 |
The Dropbox Configuration Dialog
The group of the new dropbox is set with the
Default Group: dropdown and the
path with the Path Spec: field.
Important
The Path Spec: field must match
the full file path of the files to be
processed, not just the sub-directory that contains those files.
For example: say we have a directory called '/home/rd/dropbox', which contains the following files:
mysong.mp3 |
mysong.wav |
yoursong.mp3 |
Table 10.2
shows the results using various example
PathSpec: values.
Table 12.2. Dropbox PathSpec Examples
| PathSpec | Matches | Comments | |||
|---|---|---|---|---|---|
/home/rd/dropbox/* |
| Matches all files in
/home/rd/dropbox | |||
/home/rd/dropbox/*.mp3 |
| Matches every file in
/home/rd/dropbox that ends
with .mp3 | |||
/home/rd/dropbox/mysong.* |
| Matches every file in
/home/rd/dropbox that begins
with mysong. | |||
/home/rd/dropbox | Matches nothing. [No file part of the PathSpec]. | ||||
/home/rd/dropbox/ | Matches nothing. [No file part of the PathSpec]. |
A new dropbox created with just the
Default Group: and
PathSpec: fields set and no
other parameters changed will detect any file that matches the
PathSpec:, create a new cart in the
Default Group: and then attempt
to import the file into a new cut in the cart.
Important
For this process to work, the specified group must also have
its Default Cart Number:
fields in the Group Dialog set to a valid range, and there
must be a free number within that range available. If either
of these conditions are not met, the dropbox will throw an
error.
Note
The importation will only happen once for
each file matched. To get a dropbox to re-process files
that have already been imported, touch the
Reset button.
The following controls can be utilized to influence how a dropbox will process a matched file:
-
To Cart: Add a new cut to the specified cart and import into that, rather than creating a new cart. If the
Delete cuts before importingbox is also ticked, then any existing cuts in the specified cart will be deleted before adding the new cut.-
Metadata Pattern: Attempt to discern the title to give to the new cart from the name of the matched file, using metadata wildcards as a template.
-
User Defined: Set the value of this field as the user defined field of the new cart.
-
Log events in Syslog If ticked, log messages for this dropbox will be sent to the system syslog. Otherwise, these events will be sent to the file specified by the
Log File:setting below.-
Log File: The full path to a file to which to write a log of dropbox operations. Useful for troubleshooting problems. If a log file is not specified, the log will be written to the log specified in the
[Logs]section of rd.conf(5).-
Delete source files after import Delete the source file after successful importation.
-
Update Metadata Update cart-level metadata on successful importation when adding an additional cut to an existing cart . Checked or unchecked, this option has no effect on updating the metadata when importing audio into a cart for the first time.
-
Send e-mail reports A report will be sent to the
Notification
		E-Mail Addresses
associated with the destination group for each file processed by the dropbox.-
Force to Monaural Import the matched file to a single channel (mixing multiple channels together if necessary).
-
Normalize Levels Peak-normalize the matched file to the specified
Level:in dBFS.-
Autotrim Cuts Autotrim the matched file, using a threshold of
Level:dBFS.-
Insert Segue Markers If no segue marker information is found in the metadata of the matched file, create segue markers, starting at the last instance of
Segue Level:and lasting forSegue Length:milliseconds.-
Get cart number from CartChunk CutID Determine the number of the destination cart from the matched file's CartChunk CutID field. If the cart does not exist, it will be created. The destination cart must lie within the valid range for the specified group.
-
Get cart title from CartChunk CutID Determine the title of the destination cart from the matched file's CartChunk CutID field.
-
Offset start date If a start date is found in the matched file's metadata, add the specified
daysto it.-
Offset end date If an end date is found in the matched file's metadata, add the specified
daysto it.-
Create Dates when no Dates Exist If no start or end date is found in the matched file's metadata, add such, adding the specified number of days to the current date.
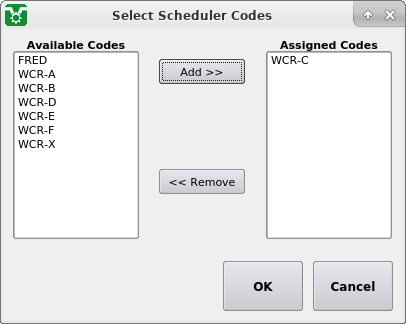
Carts created by this dropbox can be assigned one or more existing
scheduler codes by touching the
Scheduler Codes button to open the
Select Scheduler Codes dialog.
 |
The Select Scheduler Codes Dialog
To configure the Switcher/GPIO devices, touch the
Switchers/GPIO button to open the
Rivendell Switcher List dialog.
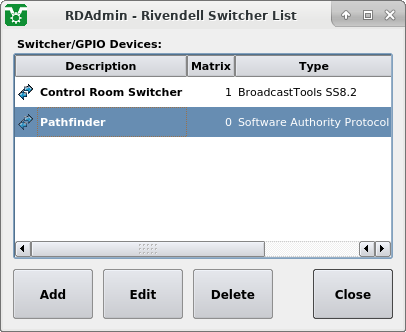 |
The Rivendell Switcher List Dialog
To add a new Switcher/GPIO device, touch the
Add button to open the Add Switcher
dialog.
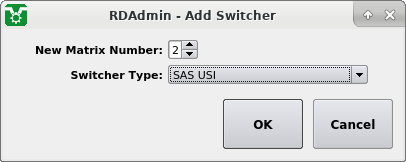 |
The Add Switcher Dialog
Select the type of switcher being added on the
Switcher Type: dropdown and then
touch the Add button to open the
Edit Switcher dialog.
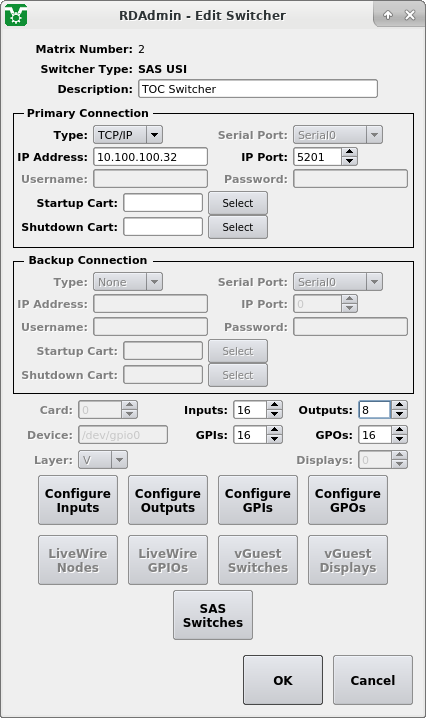 |
The Edit Switcher Dialog
Note
Rivendell supports a huge diversity of third-party switcher and GPIO devices, every one of which has its own unique operating requirements. The description which follows provides a broad overview of how these devices are configured, but be sure to consult the device-specific notes for the unit question in Appendix C, Supported GPIO/Switcher Devices as well.
If the target device is controlled via some sort of
connection (TCP/IP or serial), that connection
is configured in the Primary Connection
section of the dialog. (Certain devices support multiple, redundant
connections, in which case the
Backup Connection section will be
available as well).
The Type: dropdown is used to
indicate if the connection is via TCP/IP or
serial. If serial is
selected, then the serial device to use can be selected by means of
the Serial Port: dropdown.
Important
If using a serial port, be sure that the selected port has also been configured! See Section 12.5.11, “Configuring Serial Ports”.
If TCP/IP is selected, then the
IP Address: and
IP Port: fields must be populated.
Certain devices also require that the
Username: and
Password: fields be populated as
well.
The Startup Cart: and
Shutdown Cart: fields take the
number of a macro cart that will be run after the connection
established or dropped, respectively.
Below the Connection settings are various miscellaneous controls and buttons. Not all of these are used for all supported devices.
Use of the Card:,
Device: and
Layer: fields are specific to
the type of device. See that device's entry in
Appendix C, Supported GPIO/Switcher Devices for more
information.
The Inputs:,
Outputs:,
GPIs:,
GPOs: and
Displays: controls should be
set to the number of those resources the target device contains.
In many cases, these fields will be auto-detected by Rivendell's
driver.
The Configure Inputs and
Configure Outputs buttons
can be used to assign names to each switcher input and output
on the target device. These names will appear in RDCatch when
configuring record events.
The Configure GPIs and
Configure GPOs buttons
can be used to configure the default action to be taken in response
to reception of a GPIO event. Touching one of these buttons brings
up the List GPIs Dialog.
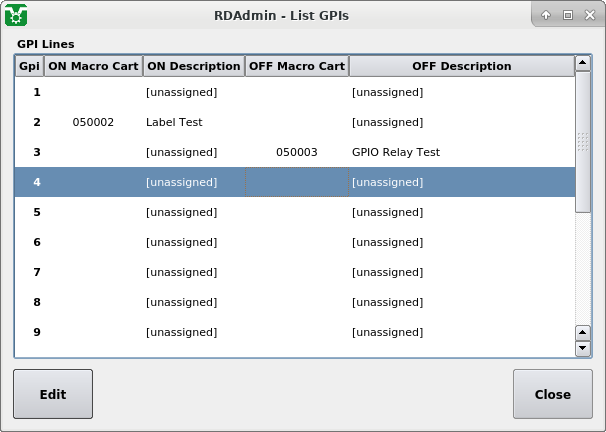 |
The List GPIs Dialog
To edit a particular GPIO line, select its entry on the list and
touch the Edit button to bring up
the Edit GPI Dialog.
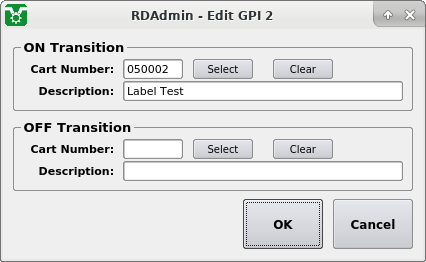 |
The Edit GPI Dialog
Two macro carts may be associated with each event: one for the
leading edge [ON Transition]
and one for the trailing edge
[OFF Transition].
Important
The macro cart associations configured here are merely defaults, set when the Rivendell service is [re]started. They can subsequently be altered dynamically through use of the GPI Set ['GI'] command. (See Section 14.9.18, “GPI Set [GI]”).
Host variables are alphanumeric tags bracketed
by '%' characters --e.g. %HOST_VAR% -- that
can be assigned string values on a per host basis. When used in
the command list in a macro cart, the assigned string is
automatically substituted for the variable name.
To add, edit or delete host variables, touch the
Host Variables button to open the
Host Variables dialog.
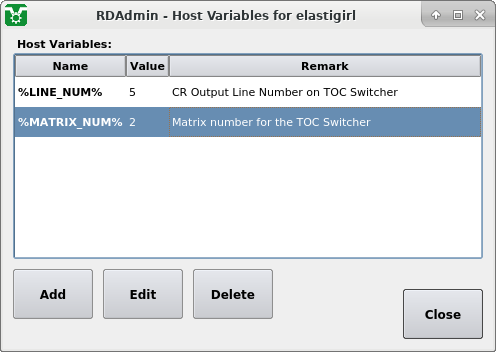 |
The Host Variables Dialog
To edit the value of an host variable, select its entry on the
Host Variables list and then touch
the Edit button to bring up the
Edit Host Variable dialog.
 |
The Edit Host Variable Dialog
To configure audio ports, touch the
Audio Ports button to open the
Edit Audio Ports dialog.
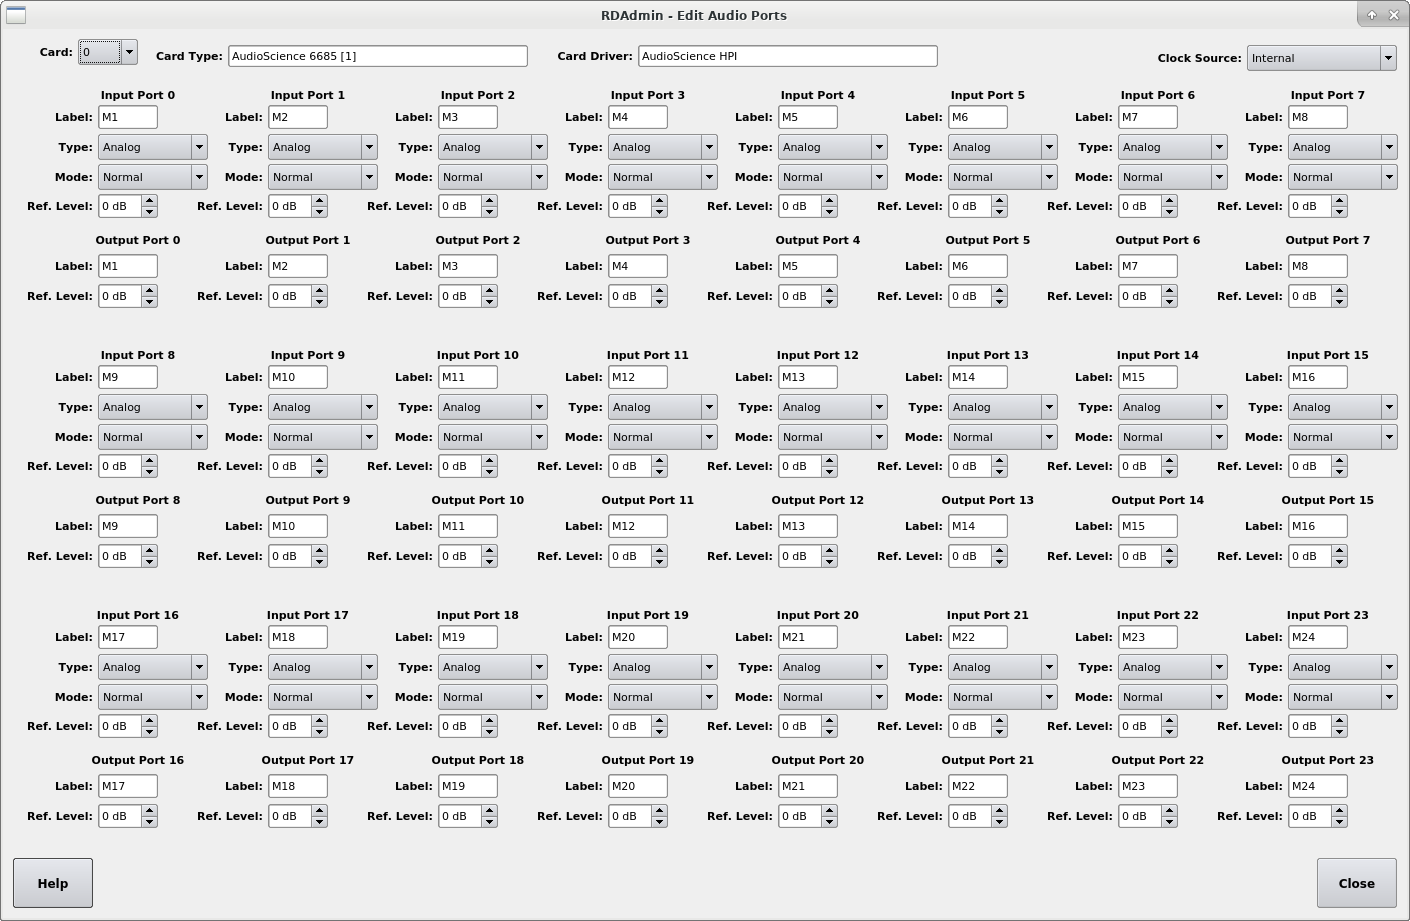 |
The Edit Audio Ports Dialog
Note
As of this writing, settings made in this dialog will have effect only on audio devices using the AudioScience HPI driver.
The Card: dropdown is used to select
the audio card to which to apply settings.
Clock Source: is used to select the
source of the sample clock.
Each input and output port on a card can be set to be of a certain
type (Analog, AES/EBU
or SP/DIFF).
The Mode: dropdown controls the
routing of left/right signals (see table below), while the reference
level of the signal at each port can be set with the
Ref. Level: control.
Table 12.3. Audio Port Mode Switch Settings
| Channels | Mode | Effect |
|---|---|---|
| 1 | Normal | Left+Right sum to mono |
| 1 | Swap | Left+Right sum to mono |
| 1 | Left Only | Left only to mono |
| 1 | Right Only | Right only to mono |
| 2 | Normal | Stereo |
| 2 | Swap | Stereo, Left swapped with Right |
| 2 | Left Only | Left only, Right muted |
| 2 | Right Only | Right only, Left muted |
To configure serial (COM) ports, touch the
Serial Ports button to open the
Edit Serial Ports dialog.
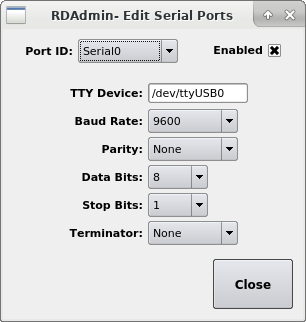 |
The Edit Serial Ports Dialog
Select the desired Rivendell serial port to configure in the
Port ID: dropdown. The
Enabled box must be ticked before
parameters can be set.
Touching the Audio Resources button
will bring up the Audio Resource Information dialog, a read-only
report detailing the current audio configuration and capabilities
of Rivendell.
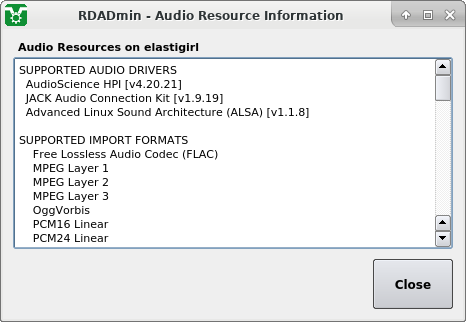 |
The Audio Resource Information Dialog
The JACK Audio Connection Kit is an audio integration system that allows audio to be shared in real-time between multiple programs. More information can be found at http://jackaudio.org.
To configure Rivendell's integration with JACK, touch the
JACK Settings button to bring
up the JACK Configuration dialog.
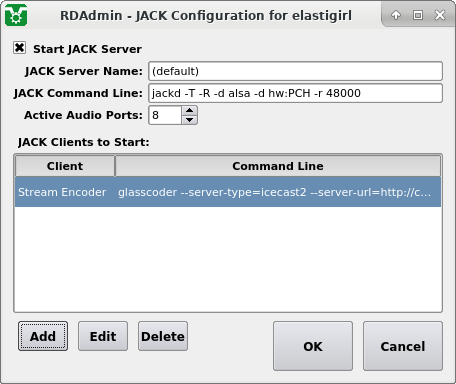 |
The JACK Configuration Dialog
To have jackd(1) automatically [re]started whenever the Rivendell
service is [re]started, tick the
Start JACK Server box and enter
the appropriate command-line invocation in the
JACK Command Line: field. The name
of the JACK instance to connect to [the "--name" option
as provided to jackd(1)] can be entered in the
JACK Server Name: field.
Rivendell can also be configured to [re]start JACK clients
automatically each time the Rivendell service is [re]started by
adding the appropriate command-line invocation to the
JACK Clients to Start list.
Filepath
wildcards can used in the command-line field.
The clients will be run under the same user as that of the
caed(8) daemon
(user 'root' [UID 0] with stock Rivendell).
Port connections between JACK clients can be managed by use
of the Jack Connect ['JC'] and Jack Disconnect ['JD'] RMLs.
See Section 14.9.6, “Connect Jack Ports [JC]” and
Section 14.9.10, “Disconnect Jack Ports [JD]”.
PyPAD is a system that is built into Rivendell that allows processing and transmission of Program Associated Data [PAD] by means of scripts written in the Python programming language.
Note
See Section 15.1.2, “PyPAD” for information on creating your own customized PyPAD scripts.
To see the list of PyPAD scripts configured to run on
the selected host, touch the
PyPAD Instances button to open
the PyPAD Instances dialog.
 |
The PyPAD Instances Dialog
To add a new PyPAD instance, touch the
Add button to open the Select PyPAD
Script dialog.
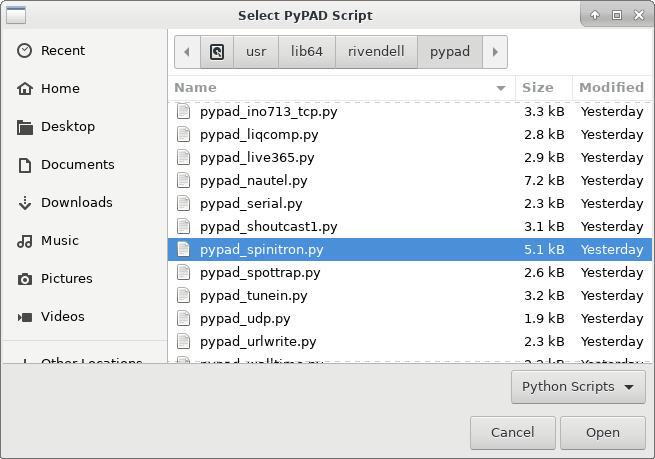 |
The Select PyPAD Script Dialog
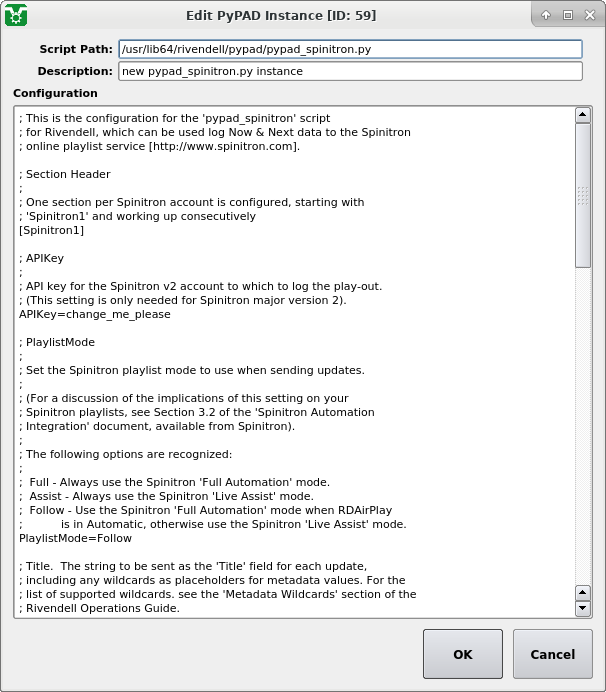
Select a script from the list and then touch the
Open button to open the Edit PyPAD
Instance dialog.
 |
The Select PyPAD Script Dialog
The Configuration box contains lines of
text that control the behavior of the script that's been selected.
Lines that begin with a semicolon character [;] are comments; the rest
are directives to the script.
When finished editing the configuration, touch the
OK button to save the configuration
and start the script running. The green light adjacent to the entry
for the script instance just edited will turn red briefly before
turning back to green, indicating that the changes to the configuration
have been applied to the active instance.
Note
It is not necessary to restart RDAirPlay for the configuration changes to be made effective.Rivendell v2.x included a feature called "Rivendell Loadable Modules" ("RLM" for short) that included much of the functionality now provided by PyPAD. The following RLMs that shipped as part of Rivendell v2.x have been ported to PyPAD and shipped as part of Rivendell 3.x:
rlm_ando |
rlm_filewrite |
rlm_icecast2 |
rlm_inno712 |
rlm_liqcomp |
rlm_live365 |
rlm_serial |
rlm_shoutcast1 |
rlm_spottrap |
rlm_tunein |
rlm_udp |
rlm_urlwrite |
rlm_walltime |
rlm_xds |
rlm_xmpad |
The formats of the configuration files used for these plug-ins are
unchanged under PyPAD. Thus, a "known good" configuration
file for an RLM can simply be copy/pasted into the
Configuration box in the
Edit PyPAD Instance dialog
when setting up its replacement PyPAD script.
Caution
Be sure to remove completely the default "sample" configuration entries before copy/pasting in the "known good" ones!
In addition to the above, some of the functionality of the
rlm_spinitron_plus RLM has
been ported into the
pypad_spinitron script.
Specifically, support for the deprecated Spinitron v1 interface
has been removed. Sites which have not yet transitioned to
Spinitron v2 will need to do so in order to use this script.
Sites which are already using Spinitron v2 can use their existing
RLM configuration unchanged.